Applies to
Smartsheet Control Center: Blueprint source folder overview
The blueprint source folder contains templates for the sheets, reports, and dashboards that are created each time you add a project. Templates help standardize business processes followed by every project, maintaining consistency in execution and reporting.
Templates are the building blocks for a blueprint. There must be at least one template in the blueprint source folder.
Blueprints with multiple sheets, reports, and dashboards can work together to implement powerful business processes. Use cell links, cross-sheet formulas, and hyperlinks to share information and create an integrated set of templates.
Name your blueprint source folder and templates
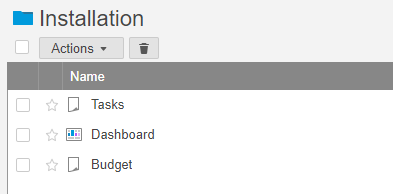
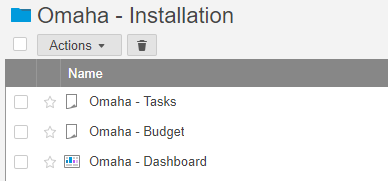
- Name your blueprint source folder after the business process you want to track (some examples include: Installation, IT Project, Store Opening, Customer Account). When you create your project folders from the blueprint, they inherit the folder name and have the same project-specific prefixes or suffixes added.
- Name individual templates based on their function (some examples include: Tasks, Budget, Dashboard, Milestone Report). When you create the project, you can add prefixes or suffixes to better identify them.


Keep the following tips in mind:
- Place your blueprint source folder in the Admin workspace. Limit access to the folder so only Program Leads can make changes.
- Templates can be optional. When you create a blueprint, you can specify which templates are optional or required.
- Control Center allows up to 75 templates.
Anatomy of a sheet template
A sheet template contains the structure maintained each time you use the blueprint.
Summary section (Profile data)

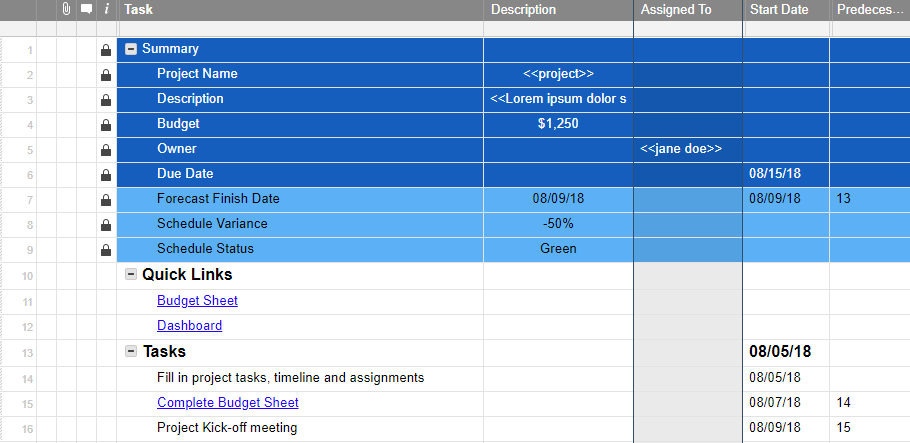
Profile data appears in the upper portion of your template sheets under a parent row called Summary. This information is populated from the intake sheet. The Summary section must follow the rules for profile data.
You can format the summary data rows to highlight profile data. To do this, set the formatting in your templates before you create new projects.
Create placeholder values for intake profile data, such as <<jane doe>> in the image. When you create a project, update these with the correct values. Placeholders help you find errors or omissions when you create a blueprint.
Save your blueprint templates as sheets, not as Smartsheet templates.
Quick links
Optional links provide users with a quick method of switching between items in the project.
Tasks
The task section is where your work happens. Sheets are flexible. Create as many rows or columns as you need (within Smartsheet limits).
Business processes appear after the profile data section. Your process may be a task list with a schedule, an issues tracker, or a budget. The actual tasks depend on your need and the desired end goal.
You can use profile data to customize the task—you may want to name cells with the business name or track budget items in the business process section of the sheet.
Report templates
Reports provide a single, focused view of data from one or more sheets. When you create a report template, you’re ensuring that the same criteria is used for each instance of a report that becomes created from that blueprint at scale.
For example, you could create a report template to display all tasks assigned to someone across all sheets generated from the blueprint.
Dashboard templates
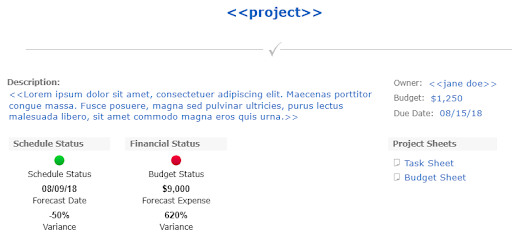
Dashboards provide an overview of a project, and they’re a snapshot presenting the most important items to stakeholders. A dashboard can also act as the front page of your project, displaying key information in one place and providing links to important sheets and reports.

The dashboard template pulls information from sheets in your blueprint source folder. Use placeholder data in the templates to help with design and layout.
Any changes you make to your dashboard template in the blueprint source folder appear across all existing projects. Updates made with the Global Updates feature don't change existing dashboards.
If you add, remove, or rename dashboard templates in the blueprint source folder, be sure to update the blueprint builder.
Keep the following tips in mind:
- Only use title, rich text, and image widgets when you know they're identical across all projects (for example, use them for instructions or graphics).
- Use a metric widget to reference profile data cells on template sheets. (If you don’t use a metric widget, you have to manually update the widgets after the project is created).
Add, remove, or change templates
When a project changes, you may need to add a new template or make changes to existing ones.
Add a new template
- Go to Menu in the upper-left corner of the Smartsheet window to open the left panel.
- Select Home > Workspaces to navigate to the Control Center workspace and select the blueprint source folder.
- Create the new sheet, report, or dashboard and structure it as desired.
- In Control Center, update the blueprint builder.
Make changes to an existing template
To change a template for all subsequent projects:
- Go to Menu in the upper-left corner of the Smartsheet window to open the left panel.
- Select Home > Workspaces to navigate to the Control Center workspace and select the blueprint source folder.
- Open the item to edit.
- Add your changes and select Save.
To change a template for all existing projects using Global Updates:
- In Control Center, select Manage Program.
- Select Global Updates > New Update in the upper-right corner of the Control Center window.
Keep the following tips in mind:
- When you add or remove templates, update the blueprint builder so new projects reflect your changes.
- Refresh your folder if you're not seeing your changes.