Applies to
Move partial rows to another sheet using a Bridge workflow
Copy partial rows from a sheet with Bridge.
You can also create a workflow that moves specific row data and deletes the original row instead of only copying.
The first step of the following workflow is to set up the copy workflow outlined here: Copy partial rows to another sheet using a Bridge workflow.
Once that's complete, follow the instructions below to delete the original rows.
1. Add a new column to your source sheet
- In your source sheet, add a new checkbox column.
- Label the column Move Row Status from Bridge.
- Save the sheet.
2. Add to your basic workflow model
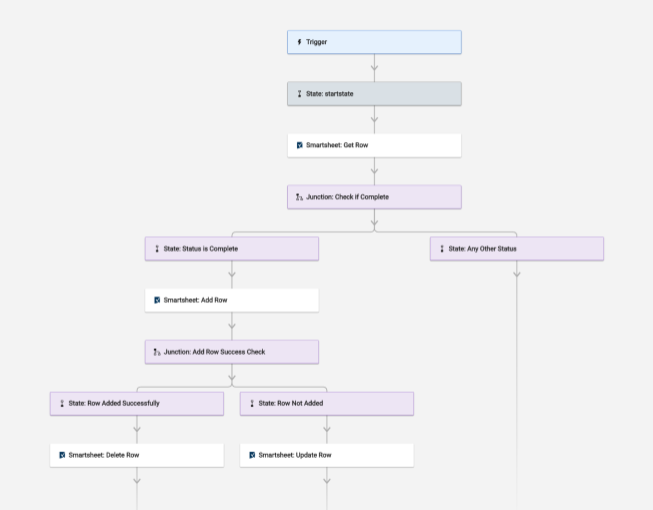
- Under the Add Row module, use the panel to add more modules in this order:
- Conditional Junctions - Match.
- Smartsheet - Delete Row. Place this module under the Row Added Successfully path.
- Smartsheet - Update Row. Place this module under the Row Not Added path.
- Save the workflow.
When you add the Match Junction
- Label it Add Row Success Check.
- Drag a new State to the left Junction path.
- Label it as Row Added Successfully.
- Drag a new State to the Junction path on the right.
- Label it as Row Not Added.
This is what you should see in your workflow when you are done:

3. Set up the workflow modules
Set up the Match module
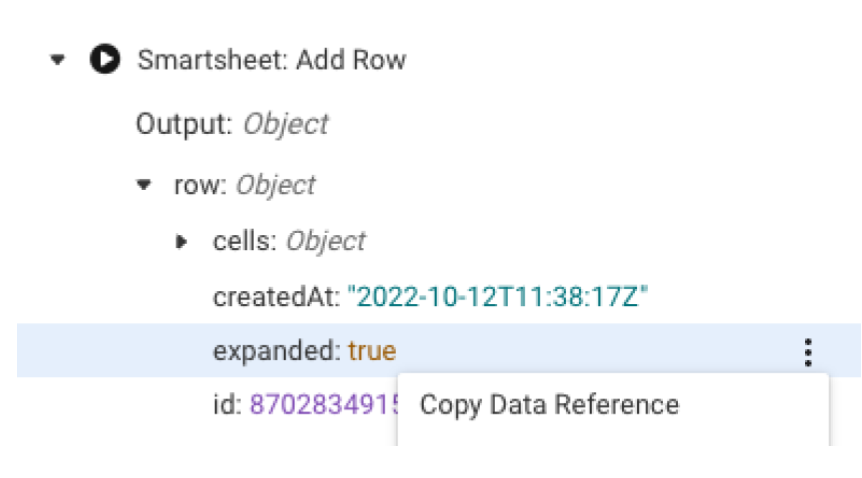
- In the First Value field, paste the runtime reference for the Add Row module expanded field. Here’s a reference on where to find the expanded field in the Run Log:

- In the Second Value field, type true.
- Save the workflow.
What does the Match module do?
The Match module checks to see whether the Add Row module was successful. If the new row was added to the target sheet, the workflow follows the Row Added Successfully path. Otherwise, the workflow follows the Row Not Added path instead.
Set up the Delete Row module
- In the Sheet field, paste the runtime reference for the sheet ID.
- In the Row ID field, paste the runtime reference for the row ID.
- Save the workflow.
What does the Delete Row module do?
If the Match junction confirms that the new row was added successfully to the target sheet, it deletes the original row from the source sheet.
Set up the Update Row module
- In the Sheet field, paste the runtime reference for the sheet ID.
- In the Row ID field, paste the runtime reference for the row ID.
- Expand Cells.
- Set up the column we will use to notify of an issue adding the row to the target sheet.
- In the Key #1 field, type Move Row Status from Bridge.
- In the Value #1 field, type true.
- Save the workflow.
What does the Update Row module do?
If the Match junction confirms the row wasn't added successfully by Bridge, the Update Row module updates the original row in the source sheet to select the box in the Move Row Status from Bridge column.
Alternative options
Parse out data to multiple sheets
Add to this workflow to move different pieces of data from your source sheet’s row to multiple sheets.
For example, columns 1–3 are moved to target sheet A and columns 4–6 are moved to target sheet B.
Include another Add Row module
- Add another Add Row module under the first one.
- Set it up for the details of the second target sheet.
Define multiple actions to take
Define multiple actions to take for the Row Not Added path of the optional Move data part of the workflow.
For example, selecting the checkbox column allows you to set up a sheet notification to notify you or trigger a different workflow in Bridge.